Creating themes using Blend editor
Installing Blend
Blend is part of Visual Studio IDE, which is available for free with Community edition. Visual Studio comes with lot of components you might not be interested in, for theme development you only need .NET Desktop development workload.
Warning
The latest Visual Studio 2022 is currently not supported (live previews will not work)! Use 2019 or 2017 version instead. Some users reported 2017 version being more reliable for theme development than 2019.
Creating new theme
Open command prompt and navigate to Playnite's installation folder. To create new theme you need to run Toolbox.exe utility with these arguments:
Toolbox.exe new desktoptheme|fullscreentheme <ThemeName>
For example to create new desktop theme with "Super Clear Modern" name:
Toolbox.exe new desktoptheme "Super Clear Modern"
This will create new theme folder with all files needed for theme to be edited in Blend. If theme creation is successful then Explorer window will open with your new theme folder. DO NOT move theme's directory, designer in Blend will not work properly unless the theme is opened from the location where Toolbox created it!
Note
There might be issues with above examples if you installed Playnite into folder where write access is not enabled by default unless you have elevated privileges (folders like c:\Program Files). In that case you will need to run command prompt and Blend with admin privileges. However better approach would be to use different install location.
Editing theme
To edit theme in Blend open Theme.sln file from theme's directory.
Note
Just opening .sln file will usually open Visual Studio instead of Blend. While you can use Visual Studio to edit the theme as well, it lacks many features that make editing easier, like live preview for templates and styles. To open .sln files in Blend, right-click on the file, select Open with and choose Blend for Visual Studio option.
Warning
Due to way Playnite resolves paths to theme files (like images), it is necessary to open theme sln file via the file itself. If you open Blend first and then use it to open the theme sln, some parts of live preview might not work properly. This will be fixed in future Playnite updates.
As a first thing after creating new theme, open theme.yaml file and change manifest fields if you need to (you will probably need to change Author at least). For more information about available manifest fields see manifest file page.
Files
Themes consist of several .xaml files. Each view, panel or specific control usually has their own xaml file. Commonly used resources like colors and brushes that affect all controls are generally defined in Constants.xaml.
Live preview
To open live preview (design view):
1) Open appropriate style (xaml) file
Not all files can be previewed in design view, some only contain constants like colors, brushes etc. Constants.xaml is best example of this. If you want to see preview for these resources, open resources window (View -> Resources window) and expand appropriate file.
2) Open design view panel
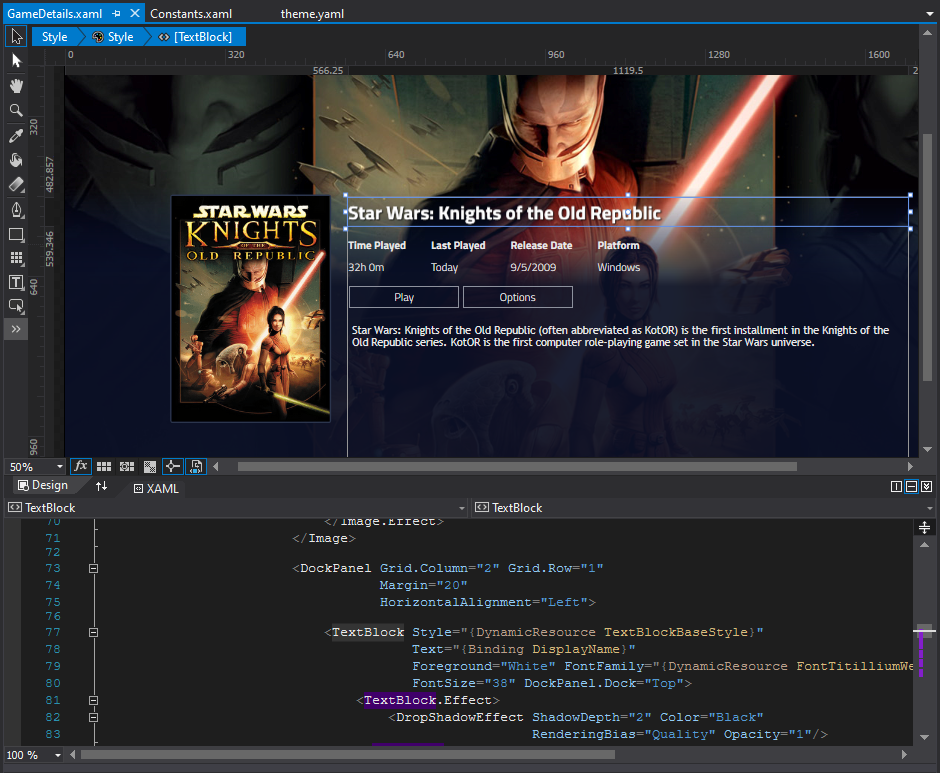
Toggle design view using Design tab button. It is highly recommended to keep XAML text view open as well since it's faster for making changes. To have both views open you can split the editor using buttons on bottom right part of the editor (offering both horizontal and vertical split.

3) Select style to preview
Since single xaml file can contain multiple styles for multiple views/controls, you need to select style you want to preview first. To do so select line in a text editor starting with <Style TargetType=....
4) Activate preview
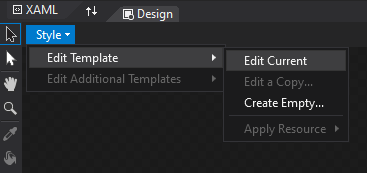
On design panel select Style dropdown, then Edit Template and lastly Edit Current. This will load preview for style you selected in previous step.

5) Enjoy
Now a preview for the specific view/control should be visible. If the view doesn't seem to display all resources properly (for example missing or incorrect colors and brushes are used), see troubleshooting section.

Troubleshooting
Fonts, colors and other resources are not applied
Opening style's design view for the first sometimes doesn't properly load referenced resources (like fonts, colors etc). This is a Blend issue and can be fixed easily by editing some part of the style, which will force the design view to reload. Switching to a different file tab and back also resolves this sometimes.
Updating ThemeFile markup doesn't update in a preview
Specifically declare RelativePath property if this happens:
<Image Source="{ThemeFile RelativePath='Images/applogo.png'}" />
...instead of just:
<Image Source="{ThemeFile 'Images/applogo.png'}" />
Design view just doesn't work
This happens if theme is not opened from correct directory. As mentioned above, theme's .sln file must be opened from the directory that Toolbox created it in. Moving to a different directory will cause issues!
Testing changes
To test theme in Playnite itself, just start Playnite and change theme selection in the application settings. No additional steps should be needed for Playnite to load the theme.
Packaging theme for distribution
See Distribution and Updates page for more details.
Warning
Please pay special attention to section about updating themes to make sure your custom theme always works with the latest Playnite version.